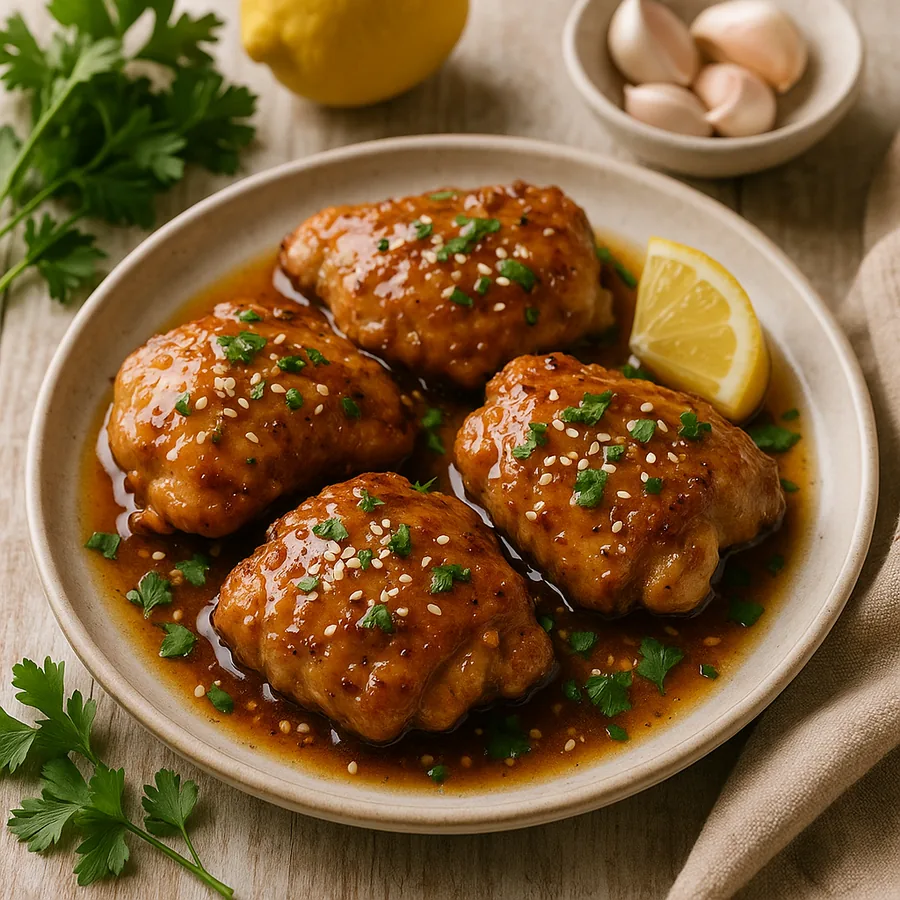
Best Honey Garlic Chicken (Sticky Pan-Seared Thighs)
You know that smell—garlic sizzling in hot oil, honey caramelizing at the pan’s edge—that fills the house and promises dinner’s going to be worth it. This honey garlic chicken is how I rescue hectic weeknights: a few pantry staples, a hot skillet, and 35 minutes from raw chicken to glossy, sticky perfection. You’ll learn how to get a crisp sear without drying the meat, make a silky honey-soy glaze that clings to every bite, and how to finish it so it looks like you spent all afternoon. This recipe is forgiving, quick, and built for real kitchens and hungry families.
Advertisement
Why You'll Love This Recipe
Why You'll Love This Recipe: This honey garlic chicken is a weeknight lifesaver—ready in about 35 minutes and made in one skillet for easy cleanup. It’s kid-friendly (sweet but balanced with soy and a touch of vinegar), crowd-pleasing for dinner parties, and budget-friendly using boneless skinless thighs. The cornstarch gives a glossy, clingy sauce so every forkful is saucy, and the method lets you swap proteins or go gluten-free with a simple soy sauce swap.
Best Honey Garlic Chicken (Sticky Pan-Seared Thighs)
By JJ Communication Test Kitchen
Ingredients
Directions
-
1Trim and dry the chicken thighs well with paper towels, then season evenly with 1 tsp kosher salt and 1/2 tsp freshly ground pepper. Drying the meat and seasoning before coating helps the cornstarch adhere and ensures a better sear, so don’t skip the pat-dry step.
-
2Place 1/4 cup cornstarch in a shallow bowl and toss each thigh until lightly coated, shaking off excess. A thin coating crisps quickly without a gummy texture; too much cornstarch makes the crust pasty, so shake well.
-
3Heat a large 12-inch skillet over medium-high heat until hot but not smoking (on an electric range this is about 375°F at the pan). Add 1 tbsp vegetable oil and swirl to coat. A hot pan gives an immediate sizzle—if you don’t hear it, the pan isn’t hot enough.
-
4Add the thighs, presentation-side down, spacing them so they don’t touch; cook 4–5 minutes without moving until deep golden brown. Flip and cook 3–4 more minutes until the second side is browned and the internal temperature reaches 155–160°F—they’ll finish while resting in the sauce.
-
5Transfer chicken to a plate and lower heat to medium. Wipe the pan if there’s excessive burnt bits, then add the remaining 1 tbsp oil and the minced garlic; cook 30–45 seconds until fragrant but not brown. Browning the garlic will make the sauce bitter, so keep it moving.
-
6Pour in 1/3 cup honey, 1/4 cup low-sodium soy sauce, 2 tbsp rice vinegar and 1 tbsp hoisin (if using); stir and bring to a simmer. Whisk in a tiny slurry of 1 tsp cornstarch + 1 tbsp water if you want extra thick sauce—simmer 2–3 minutes until glossy and slightly reduced.
-
7Return chicken to the pan and coat in the glaze, spooning sauce over each piece for 1–2 minutes until the internal temp hits 165°F and the sauce clings. The sauce should be shiny and syrupy; if it’s too thin, simmer an extra minute, watching closely so it doesn't burn.
-
8Remove from heat, sprinkle with sliced green onions and toasted sesame seeds, and let rest 3–5 minutes before serving. Resting lets juices redistribute and the sauce settle so you get tender, saucy bites rather than hot, soupy chicken.
📌 Ingredient Notes & Substitutions
💡 Chef's Tips for Success
- Patting chicken thoroughly dry is the single best hack for a crisp sear—moisture steams the meat and prevents browning, so use paper towels and press firmly.
- If your sauce thickens too much, whisk in 1–2 tablespoons warm water off heat to loosen it without losing shine; too much heat will break the honey out of suspension.
- Use an instant-read thermometer to hit 165°F for safety and perfect juiciness; thighs can be pulled at 160°F and held to 165°F while resting.
- To prevent burning the honey, keep the pan at medium to medium-high and watch closely during reduction; burnt honey tastes bitter and is hard to fix.
- Make extra sauce and reserve half raw (refrigerate) to recoat leftovers when reheating so the chicken doesn't dry out.
Nutrition Facts Per Serving
Advertisement
Ingredients & Key Substitutions
This recipe leans on a few pantry pillars: boneless skinless chicken thighs for juiciness, cornstarch for a light crisp exterior, honey for sweetness, and low-sodium soy sauce for umami. Use tamari for a gluten-free swap and arrowroot for cornstarch. If you don't have rice vinegar, substitute 1 tablespoon apple cider vinegar plus a pinch of sugar. For a deeper flavor, a tablespoon of hoisin or 1 teaspoon toasted sesame oil adds richness; skip either if you want a cleaner, brighter glaze.
How to Make Honey Garlic Chicken Step by Step
You’ll start by trimming and drying the thighs, then dusting with cornstarch for a thin, crisp coat. Sear on medium-high heat until golden—this step locks in juices. Remove the chicken, then quickly build the glaze in the same pan with garlic, honey, soy, and rice vinegar. Reduce until glossy, then return the chicken to finish to 165°F. Watch visual cues: deep golden browning on the chicken, garlic that’s fragrant but not brown, and a sauce that goes from thin to syrupy and clingy.
Advertisement
Variations & Customizations
Spicy: add 1/2–1 tsp Sriracha or 1/4 tsp cayenne to the sauce. Kid-friendly: omit red pepper flakes and use mild honey; add extra honey for sweeter kids’ palates. Slow cooker: brown thighs first, combine sauce ingredients, and cook on low 3–4 hours; thicken with a cornstarch slurry at the end. Air fryer: toss lightly oiled, cornstarch-coated thighs at 400°F for 10–12 minutes, then finish with warmed glaze. Vegetarian: pan-roast thick tofu slices or cauliflower steaks and glaze the same way, increasing glaze quantity.
Storage, Freezing & Make-Ahead Tips
Store cooled chicken in an airtight container in the fridge for up to 3–4 days. For freezing, flash-cool, then freeze in a shallow container for up to 2 months—thaw overnight in the fridge. To reheat, gently warm in a 325°F oven covered for 10–12 minutes or reheat slices in a skillet over low heat with a splash of water and reserved sauce to keep them moist. You can make the sauce ahead and refrigerate for 3 days; warm before tossing with freshly cooked chicken.
What to Serve With Honey Garlic Chicken
Serve over steamed jasmine rice or sticky rice so the glaze soaks into every bite. Quick stir-fried broccoli or bok choy adds crunch and bright color; roasted sweet potatoes or simple mashed potatoes balance sweetness. For a light side, cucumber salad with rice vinegar is refreshing. Pair with a lager or a chilled Riesling—the slight sweetness and acidity complement the honey and soy. Garnish with scallions and sesame seeds to add texture and a fresh finish.
Common Mistakes to Avoid
A common mistake is overcrowding the pan; that causes steaming, not searing—work in batches if needed. Another is adding raw honey to a pan that’s too hot, which can burn and taste bitter; keep the heat moderate while reducing. Don’t skip patting the chicken dry or you’ll lose crispness. Over-thickening the sauce with too much cornstarch makes it pasty—start small with a slurry. Finally, don’t skip resting; it helps the chicken reabsorb juices so it stays tender when you serve.
Frequently Asked Questions
How do I make honey garlic chicken sticky?
Cook the sauce down until it's slightly reduced and glossy, then toss the chicken in the hot pan so the sauce reduces further and clings. A small cornstarch slurry (1 tsp cornstarch + 1 tbsp water) added while simmering helps thicken and create that clingy, sticky finish.
Can I use chicken breasts instead of thighs?
Yes, but breasts cook faster and can dry out. Slice breasts into 1-inch pieces or pound to even thickness, sear 3–4 minutes per side, and finish in the sauce just until they reach 165°F. Reduce overall cook time and watch closely to preserve juiciness.
Can I make honey garlic chicken in the slow cooker?
You can—brown the thighs first for better flavor, place in the slow cooker with the sauce ingredients, and cook on low 3–4 hours. Thicken the sauce at the end with a cornstarch slurry on the stove because slow cooker liquids stay thin.
How do I prevent the honey from burning?
Keep the heat at medium to medium-high and add honey after the garlic has softened slightly. Stir constantly while the sauce reduces; if it starts to darken quickly, lower the heat. Adding a splash of water or vinegar can slow caramelization if needed.
Is honey garlic chicken gluten-free?
It can be: swap regular soy sauce for tamari or a certified gluten-free soy sauce and use arrowroot instead of cornstarch if preferred. Check hoisin sauce labels or omit it since many hoisin sauces contain wheat.